Material on this web site copyright © 1995-2016, TelePost, Inc. All rights reserved.
Pricing and specifications subject to change without notice.

LPB2 Software Page


Warning: LPB2 is not compatible with newer versions of HRD because HRD now uses Unicode (32-bit) character encoding for text fields. AFAIK, this problem only exists with HRD, and only with newer versions. We plan to support the newer version when we can get to it, but other things currently have a higher priority.

Overview:

LPB2 is a new version of LP-Bridge which has been expanded to support more radios than the original, which only supports the K3. At least for now, LPB2 has some limitations compared to LP-Bridge. Below are some differences and similarities between the two versions...

LPB2 provides support for K2, K3, Yaesu (950,2000,5000) and Kenwood.
LPB2 supports adjustable baud rate.
LPB2 does not support TRX-Pan.
Both versions support PowerSDR/IF and NaP3.
Only VPort1 provides full bi-directional access to the rig with LPB2.
VPorts 2-5 provide GET support for the 8 most common commands used by most rig control applications.
VPorts 2-5 provide SET support for 3 commands... VFO A, VFO B and Mode.
All 5 VPorts provide RTS and DTR handshaking control for keying and PTT, like LP-Bridge.
Both provide output ports to drive hardware like SteppIR.

LPB2 provides two main functions... to link the SDR software to the rig for interactive control, and to allow multiple applications to talk to the rig at the same time.

SDR Linking... The following functions are currently linked between the rig and the SDR software: For all rigs... VFO A, VFO B, Mode and TX/RX.
For K3 we add support for IF center tracking, passband width and shift, preamp and attenuator settings. We will add support for these with other rigs as PowerSDR/IF and NaP3 add support for them. The links are bidirectional, meaning that any change made on the SDR software will be reflected at the rig, and vice versa.

Rig Sharing... LPB2 allows one additional application full access to the rig at the same time as the SDR software. It also allows up to 4 additional apps to read the most common rig parameters such as VFOs, mode, etc. LPB2 actually intercepts and buffers the additional polling traffic and responds immediately without sending the additional polling commands to the rig, which reduces serial traffic and eliminates packet collisions.


LPB2 is beta software. You should understand this when you use it. There may be bugs, and some things that are not finished yet, but it is solid in testing by us and beta testers. Report any bugs or feature requests to my email. It is also wise to monitor the LP-PAN User's Group for up to date feedback.

Before installing, make sure you are logged in as Administrator, or that your user account has admin privileges. This will save headaches, especially with Vista. Normally, if you are the main or only user, your default account will be Administrator or have these privileges. Click on one of the links below to either open and run the installation program, or save to your downloads folder, where you can open and run it. Install both the "full" version and the most recent release update the first time you install LPB2. Install just the "update" version if you are just updating the program, and have already installed the full version at some point. If you ever uninstall LPB2, you will have to install the "full" version again, plus the latest update.

You can track the history of releases by clicking on Software Version History.


Downloads

Note: This version of LPB2 uses the latest virtual port drivers from Eltima Software. It is certified to work with Windows 8.


LPB2 v1.07_full.zip  Save this file and unzip, then run the setup.exe file. It installs the program and virtual port drivers, and registers the drivers as well. Instructions follow after these two links. After finishing the installation of v1.07 full, return to the following link to update the LPB2.exe file to v1.08.

Note: This link updates the LPB2.exe program file to the latest version. It fixes a polling bug with Yaesu rigs. This version should be installed after you have installed v1.07 full, or if you already have v1.07 full installed.  It only updates the one file in your installation directory.

LPB2 v1.08_update.zip  Save this file and unzip it. Then run the setup.exe file.
_____________________________________________

Once unzipped, click on the program folder, then click on setup.exe to start installation. Accept the default installation directory. The virtual port drivers in LPB2 are different for each operating system. During installation, LPB2 Installation will detect your OS and install and register the correct versions. LPB2 will run on Windows 2000, XP, XP64, Vista, Vista64, Win7,  Win7/64 and Windows 8.

You will see a command console open up during installation to run the registration programs, and you will see messages that the registration was successful for the two drivers after a bit of a wait. Click OK on the two registration messages when they appear. Click Finish to finish installation. Depending on OS, you may see a message asking you if you want to reboot. Click yes if you see it. The console will close and your PC will reboot.


If asked at any time about replacing newer files on your system with older ones from the LP-Bridge installation, always keep your newer existing files. After installing, you should create a shortcut on your desktop. If you are running Vista, the shortcut should be set for administrator privileges (by right clicking on it and choosing the Run As selection). FYI, the default installation path for LPB2 is C:\Program Files\LPB2 or C:\Program Files (x86)\LPB2 for 64 bit systems.


Setup & Operation:

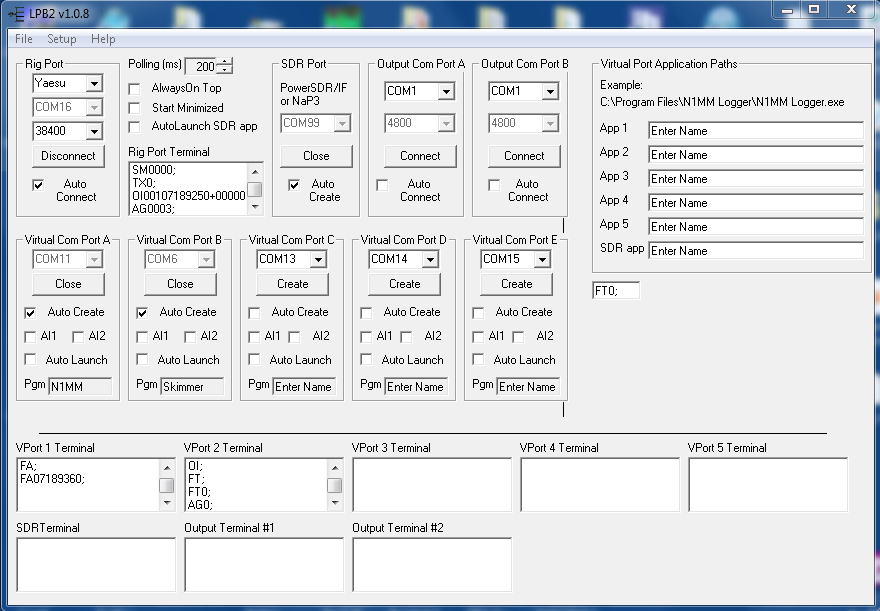
When LPB2 first starts, it will be in Setup mode. The following screen capture shows what Setup mode looks like after being set up and running with a typical configuration.


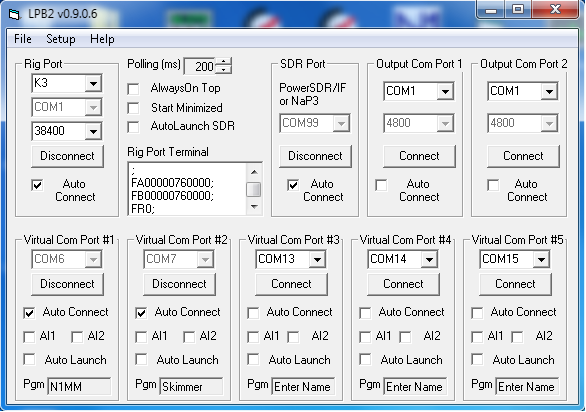
This mode is required to enter paths for the AutoLaunch feature which lets LPB2 not only create your virtual ports, but launch the application associated them. It is also used for diagnostic purposes by allowing you to view the serial traffic to/from your apps. Clicking on the setup menu and choosing "Hide" will hide the terminals and path entry boxes, as shown below...


For users with older PCs, hiding setup will use a little less CPU power. LPB2 can also be run minimized for minimum processor load and to maximize available screen space for other apps.

Here is a breakdown of LPB2 setup and configuration...

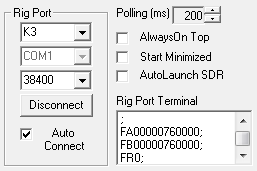
Rig Port Setup

Select rig type
Select comm port
Select baud rate
 
When starting, the button below the baud rate selector will read "Connect". Clicking this button connects to the rig, which is indicated by watching the serial traffic in the Rig Port Terminal, and the button reads "Disconnect" as shown.
 
Checking Auto Connect allows the rig to be automatically connected when LPB2 is started.
 
Polling Rate defaults to 200ms but can be set faster ot slower.
 
The Always On Top checkbox allows LPB2 to supercede other windows on the screen.
 
Start Minimized allows LPB2 to start in the Taskbar.
 
AutoLaunch SDR automatically launches the SDR app (PowerSDR/IF or NaP3) when starting LPB2.


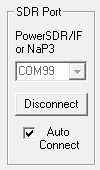
SDR Port Setup

Currently, COM99 is the only choice. This is done to avoid conflicts with any other comm port.
The same port number will need to be selected in PowerSDR/IF or NaP3 in order to set up the link between LPB2 and the SDR app. The rig selection in the SDR app should be set to the same rig type as LPB2 and the same baud rate as well.
 
The Connect/Disconnect button and Auto Connect check box function the same as the Rig Port.


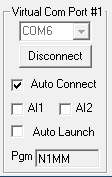
Virtual Port Setup

Select any unused port number. The Connect/Disconnect button and Auto Connect check box function the same as the Rig Port. Auto Launch is used to launch the app associated with the port.

Pgm: Enter the name of your app here to help you remember what's connected.

AI1 or AI2... used to emulate the Kenwood Auto Information modes which are required for apps which do not poll.

NOTE: Virtual Port #1 provides full bidirectional comms with the rig. VPorts #2-5 have limited support and would normally be used for a simple logger or something like CW Skimmer ot MixW.


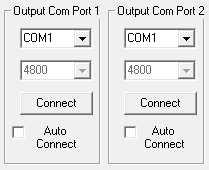
OutPut Com Port Setup...

Com Port selector: Select the port that your external hardware is connected to (SteppIR controller, amplifier, autotuner, etc.)

Baud Rate: Currently fixed at 4800 baud, not adjustable.

Connect/Disconnect: Click this button to connect to the hardware.

Auto Connect: Once everything is working well, the hardware connection can be automated to connect when LP-Bridge starts.
The K3 must be connected before the output ports can be conected.

To connect an Output port to SteppIR controller, y
ou need to connect the selected PC port to your SteppIR box Data In port. The cable to the SteppIR controller should be a DB9 female to DB9 female crossover cable. This means that pin 2 from one end should be wired to pin 3 three of the other end and vice versa. The connector on the SteppIR box uses non-standard wiring, so only wire the needed pins. Pin 2 on the SteppIR end goes to pin 3 on the computer end... pin 5 (gnd) is the same at both ends. Also, it is necessary to add a "loopback" jumper from pin 7 to pin 9 at the SteppIR end of the cable. Here is a crude diagram...


wiring-diag


Important note regarding sequencing of LPB2 and connected apps...


LPB2 must be started and the rig connected before any other ports can be connected. The SDR port should be connected next, followed by any application ports and output ports. Do not start the SDR app or any external apps until their virtual ports have been created. The sequence should be... Launch LPB2, connect ports, launch SDR app, launch other apps. All connected apps should be set for the same rig type and baud rate as the rig that's connected to the Rig Port.

If you Auto Connect for all the ports, when LPB2 is started, the rig connection will be made automatically, and all the ports will be properly created in sequence. Do not use this feature until you are sure that everything is working properly.

When shutting down, reverse the process. Close your apps first, then the SDR app, then LPB2. You can close LPB2 just by clicking the X in the upper right corner and ports will be closed in sequence automatically.

73,
Larry N8LP


Software Version History:


Version
Release Date
Notes
1.08 Update
5-27-15
Bug fix for Yaesu
1.07 full
2-8-15
Updated Eltima drivers to the latest ones.
1.06 full
1-9-13
Added support for Windows 8
1.044
5-6-12
Added support for NaP3 v1.20
1.041
3-4-12
Add support for IS command for Yaesu rigs
1.040
2-28-12
Add support for NaP3 v1.1.0
1.030
2-2-12
Fix "IF;" reporting bug
1.020
1-1-12
Made some slight changes to the GUI, added LN command and fixed a bug.
1.010
12-20-11
Added support for NaP3 v1.04
1.000
12-3
Added support for NaP3 beta 3
0.909
11-13-11
Fix bug related to mode reporting.
0.908
11-5-11
Add support for K3 firmware v4.4.2
0.907
10-12-11
Add filter to fix PowerSDR/IF RIT reset bug with FT-5000, add support for K2.
0.906 9-30-11 Initial beta release of LPB2.