
Overview
HDSDR is a much updated version of Winrad and has some nice features.
In comparion with NaP3, the most comprehensive SDR for use with LP-PAN,
there are advantages and disadvantages. The obvious differences are...
HDSDR has simultaneous pan windows for the full spectrum and the demod
passband spectrum, it is easy to install and set up, has adjustable
RBW, adjustable RF scaling for pan and waterfall, adjustable speed and
averaging for pan and waterfall, adjustable minimums for pan and
waterfall and adjustable proportioning between pan and waterfall. It
has similar adjustments for the passband window as well. It allows you
to enter global and mode offsets to properly sync the pitch between the
radio and the SDR audio. Mario was kind enough to work with me on
adding this feature. It has very flexible sound card setup options and
has fixed image rejection null adjustments. This does not provide as
deep of image null across the spectrum as NaP3, but it is set once and
forget, and is reliable. It does not automatically track K3 ofssets, so
the K3 has to be treated like any other radio in terms of the offsets.
HDSDR is Windows 8 compatible.
NaP3 provides complete integration with K3, plus band and mode stacking
memories for almost all adjustments. This is very useful for setting
optimum scaling, noise floor, RBW and other adjustments to match
atmospheric and other consistent differences between bands and modes.
WBIR, while sometimes a pain, provides almost total image rejection
when the system is setup and working optimally.
HDSDR Installation and General Operation
Refer to Mario's website, hdsdr.de.
HDSDR Setup for LP-PAN
Most of the settings appear in the Soundcard, Bandwidth and
Options buttons in the lower left of the display. Most of the settings
remain at their default values. I'll show pictures where it's
necessary to help with choices. Keep in mind, my settings are for
the K3. Other rigs may vary in terms of the CAT and offset settings.
Soundcard setup...
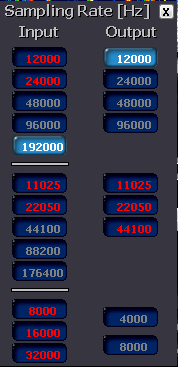
Options Menu [F7]. Select Input choice...
Choose Sound Card and either MME or ASIO. If your card supports ASIO
and you are not going to share it with another app like CW Skimmer,
choose this. Otherwise, choose MME. You will be given the chance to
choose which sound card next. You'll have a simple sound card choice
for ASIO, but choices for Input and Output for MME. Input is the signal
that feeds the pan display. Output is the speaker output of the card so
that you can hear demodulated audio from HDSDR. These choices are also
available in the Soundcard[F5] menu. In addition, you have to select a
bandwidth. This choice is made in the Bandwidth [F8] menu. For input,
choose the highest sampling rate value supported by your soundcard. For
output, you can use any value, but 12000 is usually enough for
demodulated output (6 kHz audio bandwidth). Feel free to set it higher
if you want more fidelity. Related pictures...


CAT Setup...
Options Menu [F7]. CAT to Radio choice...
Here is a representative picture for the K3. Swap CW and CW-R may not
apply to other rigs...

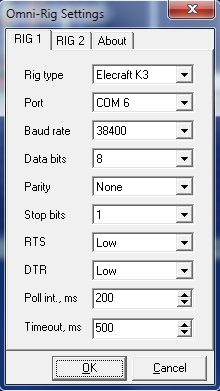
The Rig1 selection will reflect your Omnirig settings for your rig.
These are set by clicking on the Omni-Rig Setup choice. Here is what
the OOmni-Rig setup looksd like for the K3...

Setting Global and Mode Offsets...
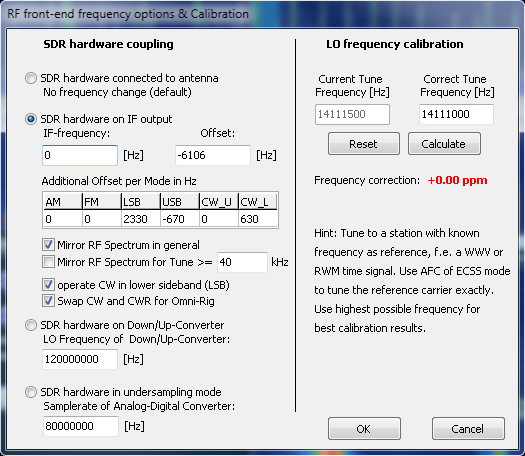
Options Menu [F7]. RF Front-End & Calibration choice...
Here is a picture of the correct settings for
the K3. Other rigs may different, but most will be similar...

The key entries are the "global" offset and
"mode" offsets. In general, the LSB will be positive and USB negative,
and they will be separated by 2700 to 3000 Hz in value. I didn't enter
a CW_U value since the K3 defaults to CW_L (lower sideband) for all
bands in CW mode. This value will be close to the CW Pitch setting in
your radio. The check boxes are correct for the K3, but possibly not
other rigs. You may have to walk these values in by listening to the
rig and HDSDR at the same time and matching pitch. The stuff on the
right doesn't matter to us.
Image Rejection Adjustment:
Options Menu [F7]. Channel Skew Adjustment for RX choice...
Related picture...

Set zoom to maximum on pan display. Tune in a
strong, steady carrier about 1/4 of the way from the left side of the
window. Its image will appear about 1/4 of the way from the right side
of the window. Use the Raw phase and amplitude controls to roughly null
the image. Use the fine controls to completely null the image. You
should be able to achieve 50-60dB image rejection across the majority
of the display when tuning from one edge to the other.
Other settings
under Options [F7] Menu:
Most of these stay at the default value. Here
are my settings for some of them...
Color Pallette... Winrad, Filled Spectrum
FFT Windowing... Nuttall
Channel Mode for RX... I/Q
Swap I/Q Channel for Receive... Unchecked
Misc Options... Swap Spectrum/Waterfall Position, checked. Normal
Process Priority, selected.
MouseWheel... Direction, Inverted. Mode, Tune. Step, 50Hz.
CAT to SDR... Used to create a port to talk to
the SDR frpom a logger. I have not played with this.