Pricing and specifications subject to change without notice.
ASUS Xonar U5 / U7
Sound card setup page
This page will outline the installation and setup of the ASUS Xonar U5 or U7 USB sound card. The examples are for Windows 7/64b, but should be similar for newer other versions of Windows as well. All active versions of Windows are supported up through 10.0. The U7 supports XP, but the U5 does not. To install the U7 on XP, use the Asus control panel. Instructions can be found on my U7 installation page.
Before we get started, here are links to the user manual and drivers, even though these are also supplied with the sound card...
http://dlcdnet.asus.com/pub/ASUS/Audio_Card/Xonar_U5/q9906_xonar_u5_qsg_v2_print_vendor_only.zip?_ga=1.113117766.352616789.1431997229
http://www.asus.com/us/Sound_Cards/Xonar_U5/HelpDesk_Download/
Manual: http://dlcdnet.asus.com/pub/ASUS/Audio_Card/Xonar_U7/E8237_Xonar_U7_manual.zip
Drivers: http://www.asus.com/Sound_Cards/Xonar_U7/HelpDesk_Download/
Follow
the manual or quick start guide for proper connections.
For U7. Line input from LP-PAN 2 connects to the jack on the front of the card with microphone icon. Headphones / speakers connect to the front panel jack with the headphone icon. USB jack connects to a USB 2.0 port on oyur PC (USB 3,0 probably OK as well). Make sure that the USB switch on the bottom of the U5 is set to "2.0".
Don't
let Windows automatically install the card. Insert the supplied
CD into the CD drive. Click on the Autorun option or navigate to the
Setup.exe file on the CD. Start driver installation. The progress bar
may not move for awhile, but it eventuallly will ;-) Once the drivers
have finished installing, reboot your computer.
Plug
a pair of heaphones or a pair of powered speakers into the HP
jack if you plan to listen to the NaP3 audio output.
We
will use a
combination of the Asus Sonic Studio configuration program and Windows
Mixer to configure the sound card. It appears to be necessary to use
both programs to fully configure the sound cards. Sonic Studio sets up
Line vs. Mic input. This must be done for the card to appear properly
in Windows Mixer. The level controls can be set in either program and
will track, but that does not appear to be the case for sampling rate.
I think it's OK to do everything in Sonic Studio if you are using the
ASIO driver, but if you want to share the card with multiple programs,
you should use the MME driver which uses Windows Mixer.
Set
up is similar for both cards.
The input and output jacks to the sound card must be plugged in before
Windows Mixer will display the input or output as active and allow
adjustments. Even dummy plaugs will work, but something must be plugged
in.
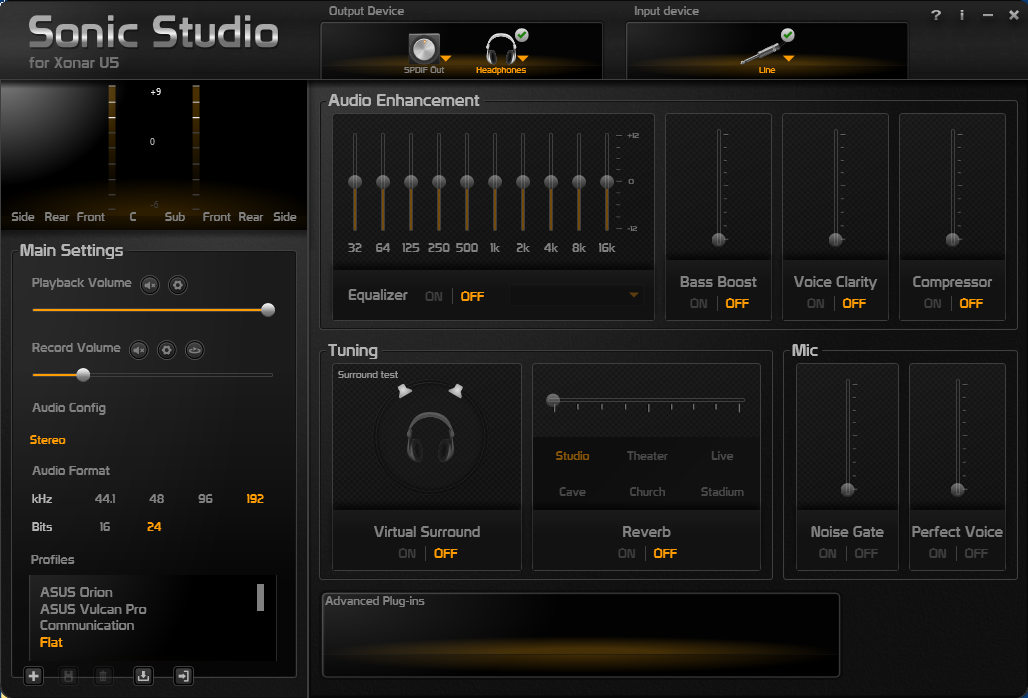
Here
is a picture of Sonic Studio with the proper settings. The important
settings are Output Device, Input Device, Record Volume, 192 kHz and 24
bits, and Flat Profile..

Setting up Windows Mixer
The mixer panel on the left is accessed by right clicking on
the little speaker icon in the toolbar at the bottom of the Windows
screen. You will be given several choices after clicking. Choose the
one labeled Recording Devices. Scroll up and down until you get to the
correct sound card and input selection. Normally an internal
motherboard sound card will be listed as the default input or output.
That's OK. Just make sure that you select the Asus as the input when
setting "Properties" for sample rate and level.
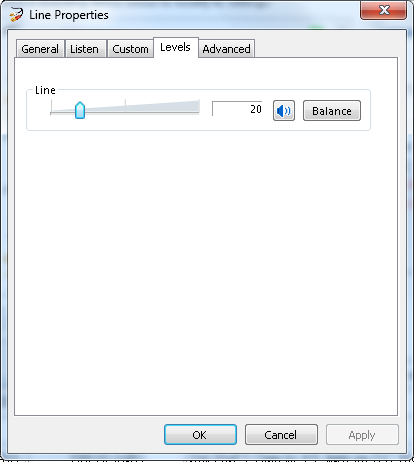
Click on the Asus Line In selection, and
then click on the Properties button to open up the screens below.
Click on the Levels tab and use the slider to adjust the audio input
level to set the proper level as shown in the table below. Right
clicking on the little speaker icon to the right of the level value
will allow you to choose between percentage gain (shown) or dB. Right
clicking on the Balance button will allow you to adjust the left and
right levels, but normally they will be with 1% of each other and well
within the range of the SDR image canceling system.


Here are some ballpark Windows Mixer levels that I found experimentally on my system for the indicated sound cards, along with some notes.
Except as noted, NaP3 Gain control is set to 0dB for older versions and -30dB for v2.7. Don't be alarmed by low level settings for some cards. This has nothing to do with dynamic range nor headroom. The reason for the "Percentage / dB" values is that Windows Mixer can be set to display either one. The gain values are derived from the sound card driver, and vary from card to card depending on driver methodology and the overall gain of the card. Note: When the sound card is adjusted according to this procedure, S9 will appear properly in the S-Meter and panadapter legend of most SDRs. The exception is NaP3 where the legend can be off, depending on sound card. This is because NaP3 does not offer a way to adjust the legend or S-Meter reading independent of the sound card levels. This is done in order to optimize the working range of the WBIR system.
| Sound card |
Windows
Mixer Level
Setting for Optimum Dynamic Range Percentage / dB |
Notes / Suggestions |
| Realtek ALC882 "HD
Audio" |
60
(+7.6dB) |
Use 1/8" (3.5mm) stereo Y
adapter and Blue LINE IN jack |
| E-MU 0202 / 0204 /
0404
USB |
3
(-0.4dB) |
Front panel pots at 10 o'clock |
| M-Audio Audiophile
2496 |
100
(0.0dB) |
Set NaP3 Gain to +6 |
| USB SoundBlaster
HD (SB1240) |
100
(0.0dB) |
Set NaP3 Gain to +3, turn on DC
Block. |
| USB SoundBlaster
XFi (SB1090) |
66
(+8.5dB) |
Turn on DC Block for NaP3 |
| Steinberg UR22 |
100
(0.0dB) |
Front panel pots at 9 o'clock,
turn on DC Block for NaP3 |
| Syba (VIA) USB SD-AUD20101 | 0
(0.0dB) |
Set Sample Offset to +1, turn
on DC Block in NaP3, set CAL to +8.0. |
| E-MU 1212m PCIe |
100
(0.0dB) |
PatchMix level set to +7dB. ASIO
works a bit better than MME |
| Infrasonic Quartet |
---- |
Use ASIO driver and manufacturer's control panel |
| Asus Xonar U7
USB card |
20
(- 20dB) |
Set NaP3 Gain
to +10.0. |
| Asus Xonar U5
USB card |
10
(0 dB) |
Set NaP3 Gain
to +10.0. |
| Sewell SoundBox Pro USB |
20 (-8dB) | Set NaP3 Gain to +10.0. Use Xear Control Panel to set this card up rather than Windows Mixer. |
| Asus Xonar DSX PCIe |
20 (-14.9dB) |
Set NaP3 gain to +10. Set this
card up in Windows Mixer |
When you have set the card up, save the settings and exit the program by clicking OK. Now the Asus will be avaialble at the highest bandwidth to NaP3 and CW Skimmer simultaneously.
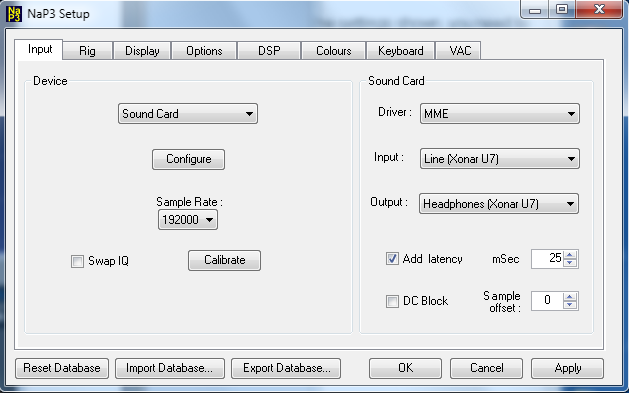
Setting up NaP3 for use with ASUS Xonar U7 (similar for U5)
Launch NaP3. On the main NaP3 window, select File, then Configure NaP3. The first tab in NaP3 Setup is Input. Enter the settings below as you see them.

Click Calibrate to bring up a Gain window. Set the gain to +10.0 dB. The Configure button can be used to check for balance between channels (the bar should be near the center of the display). Unless you have a bad cable, or set the sound card left and right channels to different levels, this step should not be necessary. Click OK to exit and save the new settings.
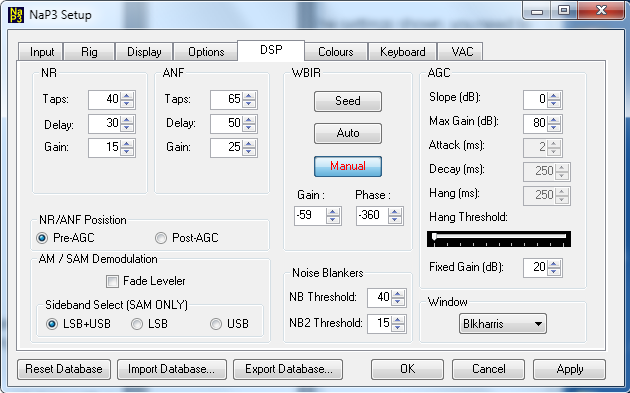
At some point you will need to "seed" the WBIR (WideBand Image Rejection) alogorithm to eliminate images. This is best done with a strong carrier somewhere on the screen about a quarter of the way from the left... preferably by itself. A signal generator such as the inexpensive little XG2 from Elecraft makes this a snap.
The function is located on the DSP tab...

My preference is to select Manual mode. This provides at least 60dB image rejection, with no chance of the setting being lost due to poor band conditions, flaky cables or improper powering up sequence of the rig, LP-PAN 2 and the software. Clicking Seed will cause the algorithm to quickly find a solution and minimize the image. You can log the values in case you ever need to enter them manually. They should stay there unless there is a catasptrophe. Click OK to save and exit.
This finishes the basic audio setup of the ASUS and NaP3.
Setting up CW Skimmer for use with ASUS Xonar U5 / U7