Installation:
Check the TelePost Inc. website for the latest version of LP-StepLink at http://www.telepostinc.com. Select Downloads, then LP-StepLink.zip. Download and save it to a temporary directory, like /Temp. Unzip the file and save the resulting files in a convenient permanent directory for future reference.
Run the Setup.exe file, and you will see the LP-StepLink setup wizard. Follow the instructions, and LP-StepLink will be installed in the LP-StepLink directory of your Program Files directory. If you don't want to use the default settings, you can enter a path where you would like LP-StepLink installed. Additional files required by LP-StepLink will be installed in your Windows/System32 or WINNT/System32 directory, depending on your operating system.
NOTE: If you are installing a newer version on a machine with an older version, you must first remove the old version using Add/Remove Programs in the Windows Control Panel.
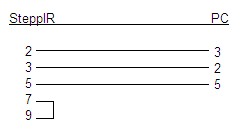
You need to connect your rig to the com port that the logging program is using, and connect your SteppIR box (Data In) to the com port that LP-StepLink is using. The cable to the SteppIR controller should be a female-to-female crossover cable. This means that pin 2 from one end should be wired to pin 3 three of the other end and vice versa. The connector on the SteppIR box uses non-standard wiring, so only wire the needed pins. Pin 2 on the SteppIR end goes to pin 3 on the computer end... pin 5 (gnd) is the same at both ends. Also, it is necessary to add a "loopback" jumper from pin 7 to pin 9 at the SteppIR end of the cable. Here is a crude diagram...
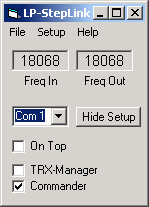
To see the setup choices, simply click on the "Setup" menu choice. The window will expand to show the choices. Setup is as easy as selecting the correct Com Port, source program and whether you want the program to always be on top (visible above all other windows). On versions of TRX-Manager 3.7 and later, OLE is automatically invoked as needed. On Commander and future programs, DDE is automatic if the source program is running. After you have made your selections, you can click on the "Hide Setup" button to hide the setup parameters, making the window smaller.
On the SteppIR controller, enter the Setup mode, and set Rig as Kenwood and Baud as 4800. Also, select General Coverage mode as you would with any rig. These settings will work with any brand of radio that is selected in the logging program. In essence, LP-StepLink becomes your rig as far as SteppIR is concerned. You can select any rig that is controlled by the logging program and the SteppIR will be happy.
Operation:
With your logging program running, launch LP-StepLink. If you have the correct logging program selected in LP-StepLink setup, then you will see the logging programs' transmit frequency in the left window. Note: The transmit frequency is determined as follows:
If "Split" is on, the program displays the VFOB freq.
If "Split" is off, the program displays the VFOA freq.
This eliminates the SteppIR retuning between transmit and receive when split operaation is used. Also, I have added 10 kHz of hysteresis to the program to eliminate hunting by the SteppIR when near a retune point in the middle of a 50 kHz SteppIR segment, ie. 14025, 14075, 14125 etc.You will notice as you tune that the Freq In display will move in 1 kHz increments, but the input frequency must more more than 9 kHz in one dorection before the Freq Out display will update. As an example, if you are on 14175, and tune back and forth between 14171 and 14180, the output will stay on 14175. With a normal Y cable setup, your SteppIR will retune each time you cross 14175. This applies to all transition points.
LP-StepLink also outputs frequency data to a pegasus.out file in the C:\Program Files\LP_StepLink\ directory. This lets you send freq data to additional logging programs which accept such data, like DXBase.
That's all there is to it.
If you have any questions, or need help, contact me at larry@telepostinc.com